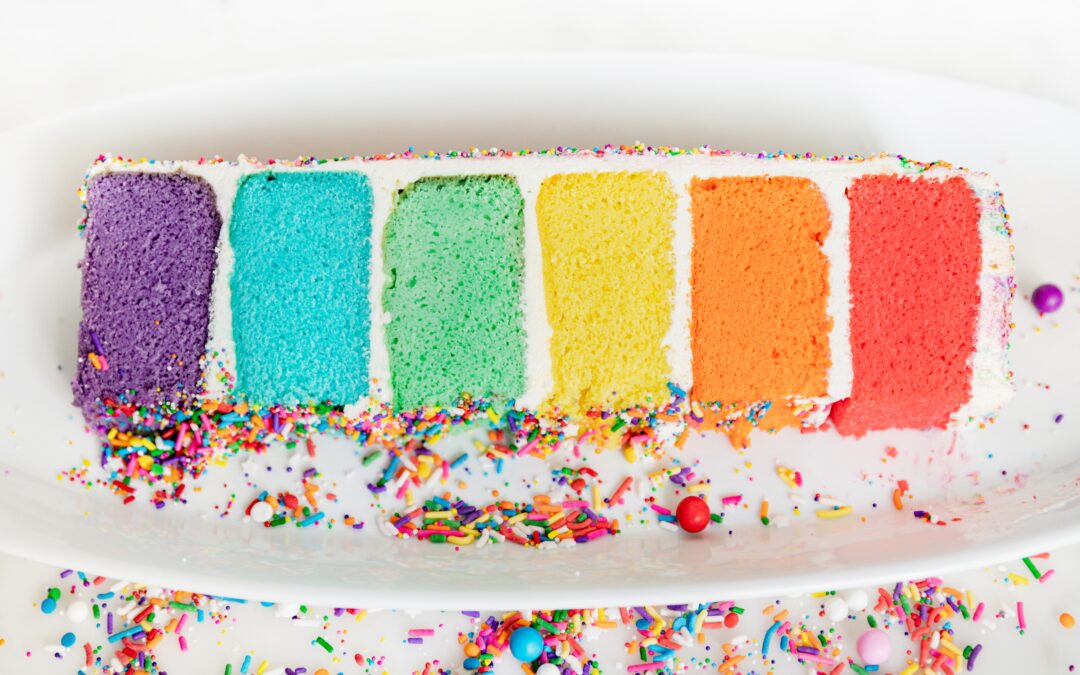

This rainbow Explosion Cake has been adapted from the brilliant minds at the Flour Shop NYC where you can purchase an Explosion Cake kit. We are stubborn and like to do things our own way, so this is our version.
But before we dig in on this amazing cake, which tastes great too, let’s talk a little bit about why everything is covered in rainbows this month. Because let’s be honest, it’s not about cake.
Although the month of June is filled with Pride parties, rainbow costumes, drag shows, colorful city lights and confetti-filled parades, it is rooted in a serious and necessary civil rights struggle. June commemorates the rising-up of the gay community during the Stonewall Riots and recognizes millennia of horrific discrimination against LGBTQ individuals.
Homosexuality is anything but new, however civil rights for homosexuals are still, to this very day, severely lacking. Gay sex was a criminally punishable offense in many states in the 1950’s and 60’s. I grew up knowing and hearing the word “faggot” being used openly (and without punishment I may add) to bully gay teenagers. Calling something or someone “gay” was a regular insult in the 1990’s and 2000’s. Hell, same-sex marriage hasn’t even been legally honored across the United States for a full decade.
We live in the state of Missouri, one of 27 states that STILL have zero non-discrimination protections for LGBTQ people. They can still be fired or denied housing based on their sexual orientation or gender identity. WHAT?! Yes, it’s true. How about an example…
2018, Friendship Village, Sunset Hills, MO
Friendship Village is a retirement community located in the suburbs of St. Louis, Missouri. In 2018, a same-sex, married couple Mary and Bev, who have been living together since 1978, decided it was time to downsize and join a bunch of their friends in Friendship Village. They visited multiple times and excitedly put down a deposit on one of the apartments. However, they were then turned away on the grounds that their relationship didn’t match the “biblical definition” of marriage between a man and a woman. So, no golf cart outings and afternoon margaritas with their friends just because they are lesbians. Seriously, they have been happily living together as long as I have been alive. I call absolute bullshit and give the decision makers at Hostile to Lesbians Village a big middle finger.
We have a long way to go ‘merica! So think of Mary and Bev as you dig into this colorful project and put on a playlist filled with the sweet beats of Cher, Lady Gaga, Kylie Minogue, George Michael, Madonna…and maybe even a little ABBA?! As Britney said, “Now get to work bitch!”


WHAT YOU NEED
4x The Best Vanilla Cake recipe
2x Whipped Buttercream Frosting recipe
Food coloring in 6 rainbow colors
Large container of rainbow nonpareils (at least 20 oz)
12 oz of rainbow sprinkle mix
8” cake pans (the more you have the faster this will go!)
2” biscuit cutter
Optional: Frosting spatula
Optional: Pre-cut 8” parchment rounds


STEP ONE: BATTER
Make all your cake batter. You are going to make The Best Vanilla Cake Ever batter recipe 4 times and you should end up with at least 24 cups of cake batter. This cake takes a few steps, so I suggest spreading them out! If you would like, you can make all of your batter and refrigerate it for up to a couple of days.
STEP TWO: CAKES
Pre-heat oven to 325 degrees F.
Pour 4 cups of batter into each of 6 bowls. Add food coloring to each bowl and mix with a hand mixer on low speed until color is even. Your bowls of batter should be red, orange, yellow, green, blue and purple.
Prepare your 8” round cake pans. Grease the sides with butter and dust with flour. I like to use these 8” pre-cut rounds for the bottom of my pan to make things easier! If you are not using parchment, then be sure to grease and flour the bottom of the pan as well.
Pour one of each color batter into each of your cake pans. Place two to three pans in your oven at a time. Cooking time should be around 50-60 minutes.
When a toothpick comes out clean, remove cakes from the oven. Allow to cool in the pan until it can be handled. Then gently flip cakes out onto the cooling rack.
Repeat this process until you have made all 6 colorful cakes.
Here’s another good place to rest! Wrap cakes in two layers of press and seal cling wrap and place in the freezer until ready for the next step.


STEP 3: CAKE HOLES
Time to put that 2” biscuit cutter to use! Remove cakes from freezer and unwrap. Press biscuit cutter down in the center of each cake EXCEPT FOR THE RED ONE!!! This is super important! One time I absolutely was on a roll and totally cut a hole in the red one. The red is the top layer of your cake and should not have a hole in it! Be better than me. 😉
Honestly, you now have 5 adorable little, tiny 2” cakes. Have fun with them! Or dip them into the icing you are about to make and eat them as a little precursor of fun delicious times ahead. Yum!


STEP 4: WHIPPED BUTTERCREAM ICING
You will need to make a double batch of our Whipped Buttercream Icing to have enough for this entire cake. You will have a little leftover so feel free to dip your tiny cakes in it for a snack! I’m going to be honest with you, this icing is a little tougher to deal with than your standard, sugary buttercream. But it is my absolute favorite and totally worth it!
STEP 5: ASSEMBLE (ALL BUT RED!)
It’s finally time to start building! I like to do this when my cakes are a bit cold. Taking them out of the freezer and going straight to icing helps the cakes stay together better and have less crumbs. Just my two cents!
Working from the bottom up…place your purple cake on your cake plate. If you are using a decorating turntable, place it on a cardboard round so that you can move it to your cake plate when complete.
Place a layer of icing on top of the purple cake, avoiding the hole in the center. Next place the blue cake, followed by icing, green, icing, yellow, icing, orange, icing and STOP. We have now once again made it to a moment of truth! I know, you want to finish the rainbow. I too want to finish the rainbow, but we need to do one more thing first…


STEP 6: FILL WITH SPRINKLE EXPLOSION
The first time I made this cake, I totally put on the red layer and forgot to put in the sprinkles. Good news is, you can totally take it back off and fix it, but don’t be like me. Do it right the first time!
Pour your 12 oz of sprinkles into the hole you have going down the center of the entire cake. So fun!
Finally, place that red layer on top. You’re almost done!


STEP 7: CRUMB COAT
Spread a thin layer of icing over the entire cake. Move the cake to the freezer for at least half an hour before moving onto the next step.
Once again, this is a good spot for a rest. The crumb coat will seal in all of the moisture and your cake will stay fabulous in the freezer for a couple of days if you need a break!
STEP 8: FINAL ICING
Spread a thick layer of icing all over the entire cake. Smooth using a spatula, cake scraper or icing smoother (or a mixture of all of the above!) Honestly, the cool thing about this cake is the icing does not have to be perfect…AT ALL. You are going to cover the whole thing with sprinkles so don’t go all OCD on it. Trust me, it’s not worth it.
After the entire cake is iced, pop it back in the freezer to get the icing to set up more to the consistency of butter.


STEP 9: SPRINKLES EVERYWHERE
We are here! The final step! Applying the rainbow nonpareils is actually kind of satisfying. You are going to scoop some into your hand and press them onto the cake while slowly moving your hand. I personally find it natural to place my hand at the bottom of the cake and slide it up while lightly pressing in.
NOTE: Sprinkles are going to go everywhere! I recommend placing a pan in your sink and putting the cake on the pan. Or if you don’t care about keeping spare sprinkles, skip the pan and just do it directly in the sink. They are bouncy little suckers!


DONE!!! OMG this cake is so much fun. I can’t help but smile every time I make it. I usually put it back in the freezer or refrigerator for storage until an hour or so before it’s time to cut into it. The whipped buttercream icing holds up better that way.
Just make sure you’re ready to take a video when your guest of honor cuts it! Happy Pride to all of my LGBTQ friends and family out there! You deserve all of the love, joy, happiness, rainbows and cake your heart desires.
Cheers!
Liz
Recent Comments