Want to turn your latest frustration into beautiful art? Flower pounding might be the art medium you’ve been waiting for. Seriously, all you need is a hammer, fresh flowers, paper or fabric and a little suppressed rage. The process couldn’t be easier.
WHAT YOU NEED
- Flowers
- Hammer or mallet
- Pretreated Fabric (instructions below)
- Watercolor Paper
- Smooth surface (Like a cutting board)
- Wax Paper (optional)


CHOOSING THE BEST FLOWERS
To begin, choose fresh flowers and leaves with vibrant colors and interesting shapes.We found that flowers with flat petals worked best. Here are some of the varieties we chose:
- Pansies
- Daisies
- Chrysanthemums
- Zinnias
- Marigolds
- Stock
- Balloon Flowers
- Tickseed
- Delphinium
- Saxifraga
Leaves with interesting textures and shapes can also be used to create unique designs, such as ferns, ivy, and most of the leaves from the flowers above.


PREPARING FABRIC
Treating fabric before flower pounding can help the natural pigments of the flowers to adhere better to the fabric and create a more vibrant and long-lasting print. Here are some steps to treat fabric for flower pounding:
- Wash the fabric: Wash the fabric in cold water without any fabric softeners or detergents. This will help remove any sizing or dirt that may interfere with the flower pounding process.
- Soak the fabric: Soak the fabric in a mixture of water and alum powder for a minimum of 2 hours and up to 24. Alum is a natural mordant that helps to bind the pigments to the fabric. The ratio of water to alum powder should be 16:1.
- Rinse the fabric: After soaking, rinse the fabric thoroughly with cold water to remove any excess alum.
- Dry the fabric: Hang the fabric to air dry or tumble dry on low heat. Do not use fabric softeners or dryer sheets, as they can interfere with the flower pounding process.
Once the fabric is treated, it is ready for flower pounding.


THE PROCESS
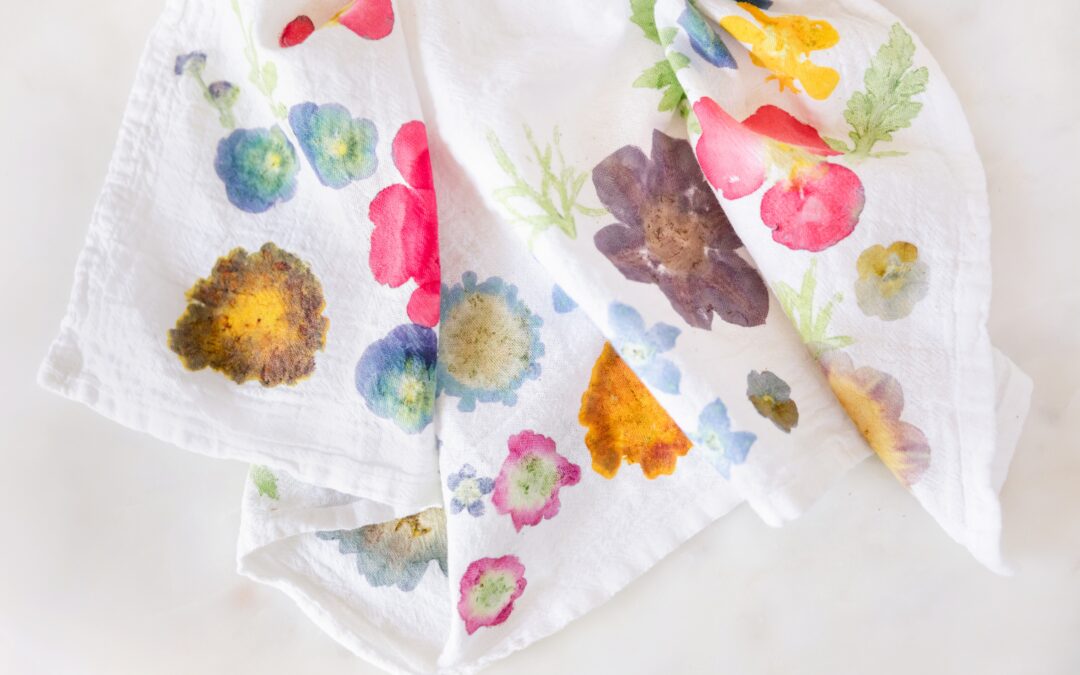
Find a nice flat surface. Cutting boards work well for this. Cut each flower at the base, close enough to remove the whole stem while still keeping the flower intact. When you have an assortment of cut flowers in different sizes and shapes, arrange them face down on a piece of watercolor paper or fabric.
Cover the flowers with wax paper or more fabric. Working from the edges of the flowers inward, tap the flowers with your hammer or mallet. The natural pigment will be released and transferred on to your paper or fabric.
Once the petals have transferred enough pigment, remove the wax paper or fabric. Carefully peel off the actual flowers and let the surface dry.


Beautiful! Fun!
Thank you! Let us know if you decide to try it! We’re here if you have questions. 🌸
Can you wash the fabric in the machine afterwards or does it need to be fixed again at all? Thinking of jazzing up some baby grows!
That’s my question as well! Tried asking on a REEL on Facebook but couldn’t reply to an existing comment!
Hey! Yes you can wash it – no more fixing needed! That said, the colors will change. I have not figured out a way to get the red and pinks to hold up. They turn more purple/blue.
What about vinegar. Would that keep the color like easter eggs?
wAU Women’s Agricultural Union Organization of Kempton Patk South Africa did a work class today! We enjoyed it thoroughly
How fun – and noisy, lol!!! If you have any photos or videos, we would love to see them! You can tag us on instagram @weareprettytogether or facebook @prettytogether. Also please reach out if you ever want any other craft activity ideas. As you may have noticed, we love making messy art with our friends.
How do you take care of the fabric afterward so it won’t fade? And is any particular type of fabric better?
Can I pound marigolds into properly treated marigold dyed cotton (tee shirt)? Say orange flowers onto yellow?
You can certainly try, and we ALWAYS encourage people to try new things! That said, I don’t imagine it will show up well. Good luck!
are you useing chives as stems they work well
I was told to boil the water with slim for two hours then let it sit in the water for overnight. Am I right
Hi Monica! I’m not sure what slim is, but that amount of time certainly won’t hurt.
I love love love these !!! They are beautiful
Thanks Peggy! Let us know if we can help you make your own!
What brand of type of alum powder do you use? Is food grade acceptable?
Once finished pressing them in fabric is there a preferred method for setting the fabric so the flowers don’t come off once printed. Thanks
Hi Jenny! Yes and no. The mordant pre-treatment is what makes it semi-permanent. The first time you wash it you will see a big change in the colors, but the design will still be present and vibrant. For instance, I haven’t figured out a flower that keeps it’s red hue after washing. I have some I have washed quite a few times (flour sack towels make the BEST dish towels!) and the pattern is still absolutely present, but has faded over time. Obviously you aren’t going to use an detergent with bleach for these though!
Yes Lindsay! I have used both from the art store and the bottles from the spice section of the grocery store. 🙂
I’m ready to try this, I think it’ll be lots of fun !!
Thanks for letting us know which flowers and leaves work best.
BARBHUNTRODS@GMAIL,COM
Just saw your segment on News 4 at Noon!
Loved your flowers! What a beautiful craft idea! Had to share right away and can’t wait to try this technique!
Checking out your website right away!
Thanks!
We can’t wait for you to try it Lisa! Let us know how it goes!
Is this permanent enough to make dish towels to be used and washed ?
Hi Donna! Yes and no. I would call it “mostly” permanent. The first time you wan it you will see a big change in the colors, but the design will still be present and vibrant. For instance, I haven’t figured out a flower that keeps it’s red hue after washing. I have some I have washed quite a few times (flour sack towels make the BEST dish towels!) and the pattern is still absolutely present, but has faded over time. Obviously you aren’t going to use an detergent with bleach for these though!
Saw this flower pounding project on Fox 2 today! Love it!
Should the fabric be white and 100% cotton only? Or will off white work and a cotton/linen blend?
When do you wash the project after the flowers are pounded? Will the flower print stay or wash out?
Thanks so much!
Warmly,
Jennifer
Hey Jennifer! Off white and white both work and we recommend 100% cotton because of the mordanting process.
Prepping the fabric makes all the difference on permanence. It’s called Mordanting and you can use that word to look up additional details online. You will want to look up specifically how to treat cotton if that is what you are using (and it is what we recommend!I) Here’s the process!
1) Pre-wash the fabric to remove any sizing put in by the manufacturer.
2) In a glass bowl, pour in hot water (120-140 degrees F)
3) Stir in Alum (can be found in grocery store spice aisle – also known as Aluminum Sulphate). Determining the amount of necessary Alum is a little tough without a kitchen scale as it is a ratio based on the weight of your fabric. If you are doing just a couple of dishtowels you should be fine with a tablespoon!
4) Allow to soak for a good 24 hours (up to 48)
5) Remove and lightly rinse in cold water
6) Dry and iron
And now you are ready to start hammering! The mordant process is what make the dyes colorfast and it will be permanent, but may fade slowly over time. Your flower pattern will become more muted and some colors will change when washed. We found that reds all turned purple when washed. Blues seemed to fade and become very pale, but were still present. We were left with plenty of yellows and greens with some other variations. Maybe keep that in mind when choosing flowers and go heavy on purple, yellow and green.
It’s made with nature so everything is an experiment! Please let us know how it goes and send pictures and feedback! Liz & Jen
Hey Liz,
Im excited to try this. In your article you mention soaking fabric in alum for 20 mins but in this comment you recommend 24 hrs? Is 20 mins actually enough?
Hi Sonya! Good catch! After a little experimenting, I am actually going to update our article. 20 minutes is a MINIMUM for sure. Somewhere in the 8 – 24 hour range is fabulous and should make the transfer more permanent. The last time I let the fabric sit in the solution overnight. Would love to hear how it goes for you!
One more question I forgot. Is a thinner tea towel thickness best or will a thicker flower sack heavier weight fabric work best?
Thanks again!
Excited to create as Mother’s Day gifts!
Kindly,
Jennifer
We tried both thick, cotton napkins and thin flour sack towels, and both worked beautifully. So at this point, I’m ready to say you can use which ever one you prefer. Good luck and let us know if you need anything else!
Hi!
These are beautiful! Does the color remain vibrate after multiple washes?
Best,
Elysia
I’m sorry Elysia I just saw this! The colors will change with washing. You definiltey lose the reds and everything becomes a bit more muted. But still pretty vibrant! As long as you use the fixer prior you should still have a vibrant pattern through plenty of washes!
This is awesome and I am going to try it for my sisters retreat gift to my sisters.
We would love to see pictures and hear how it goes for you! I’m sure they will love it.
After you let the flowers dry, what do you do? How do you set the ink in the fabric? Can the item be washed with detergent?
I would also love to know about setting and washing. Would it help to put in the dryer and heat it up to set it?
I haven’t been getting all of these notifications. My sincere apologies to everyone! I haven’t tried heat setting, but I don’t see why it would hurt? As long as you follow the instructions for pre-treating the fabric with allum powder they flowers should be permanently set. You do lose the reds in washing. They turn more purple. And I have noticed after multiple washes the pattern is more muted but totally still intact! Liz
Hi Vanetta! I’m so sorry for the slow reply. Somehow my notifications on this post were messed up. Please forgive. Yes! Go ahead and use detergent! I would wash on cold/warm and gentle, but if you follow the allum fix instructions you should be good to go. The fabric pre-treat is all you have to do to make it permanent. If you don’t then it will wash right out. Liz
Hello I appreiacte this post so much! I tried flower pounding today which brought me immense joy & I’m just wondering – Have you found any flowers that leave a pink stain, even after washing? Or red?
Thanks 🙂
Can I rinse a tea towel as soon as it’s dried fully? The smell of the mushed flowers makes me gag 🙈
Lol sorry about the flower smell. It’s kinda earthy lol. Go ahead and wash! No need to wait. Liz
I’m so sorry Monica, I haven’t found any yet! I have tried a few more, but no luck. I’m sure it has something to do with the chemical properties of the dyes, but no solution over here. I love pink too! Liz
Pink Dipladenia leaves a lovely pink stain but I haven’t washed the tea towel after the pounding yet. I’m hoping it stays vibrant but not sure.
Love the pinks! I am still yet to have one stay bright once washed. Please send an update if you decide to try it!
Can you use parchment paper or must it be waxed paper?
Parchment is just fine! Liz
Is it better to let the flowers dry on the paper and then peel off or peel off as soon as you are done pounding them? I tried last night to peel them off right away but it was rather messy.
Thank you!
Lori
You can totally peel them off right away! As long as you really hammered the crap out of them you should be good to go! Liz
Hello. Does any 100% cotton work or should it be muslin? Sounds FUN!
Thanks!
Kathryn
Hi Kathryn! We didn’t try muslin, but I don’t see why it wouldn’t work? It is a looser fabric, so I’m not sure how that will affect the print. I think you will see more of the fabric texture in it, which could be extra natural and cool looking actually. If you try it let us know!
Each year at Thanksgiving, I’m the one who provides arts & crafts for the kids. They’ve all grown so much, but I think they could do this. Youngest is 11 yrs. I’m just not sure about finding flowers to use in Rhode Island in November. What do you think?
Hi Janice! We are recovering from some website issues, so I truly apologize for the lack of reply. I hope you decided to go for it! If not, yes they can definitely do it! And you can always use grocery store flowers. Trader Joes and Whole Foods both tend to have very good selections all year round. Again, my apologies for not replying sooner. I hoe you and your family had a fabulous holiday season! Liz
What fabric did you use in your photo? I am looking for the same.. white cotton, precut with the hem?
Hi Gloria! We LOVE the flour sack towels from Target. I use them for everything! They are great for this and for our ice dyeing. https://sovrn.co/usyyqmf
I can’t get my red rose petals to give a good red color-any tips/suggestions?