
Some people are born with the art gene. Don’t get me wrong, I am a firm believer that given the right instruction, motivation and determination anyone can do just about anything they want. It’s just a matter of not being afraid to try. Until the age of about 20, my culinary skills included cereal and anything that could be cooked in a microwave. Now I can caramelize creme brulee, roll out my own pasta and bake a 6-tier rainbow cake with a sprinkle explosion center. My mom never saw that coming.
So in summary, no artistic biological material over here besides a general eye for composition, and the will to keep trying until I get something remotely resembling a desired result. I like to think I at least have good taste, but that’s subjective, right!?!
This brings me to what may be one of my favorite artistic endeavors I have tried in recent years…ice dyeing! It’s unpredictable, gorgeous, easy and cheap. The unpredictability is freeing. No piping perfect lines of icing or mixing paint to the exact consistency needed. This project is great for all ages! If you’re looking for an activity to do with your kids or your grandma, this is it. Have I talked you into it yet?! I hope so, because here we go!

Everything You’ll Need
Cotton fabric to dye: We LOVE these flour sack dish towels from Target. They are about $1 each, super soft and absorbent. We have used them as both dishtowels and napkins in a pretty place setting.
Soda Ash: Because this is a cold dyeing process, you must first pre-treat your fabric in a soda ash bath. This is a super important step! More later…
Jaquard Procoin MX powder dyes in a variety of colors
Ice (yes, captain obvious!) You will probably get through about 10 dish towels with one large bag of ice.
Drying-cooling-shoe rack: You need something to hold your fabric up off of the ground and allow water to drain and drip. I have at least ten of these shoe racks from IKEA and use them for a variety of projects!
Small stainless steel or disposable spoons
Latex or rubber gloves


THE PROCESS
Step 1: Heat up some water in a pot to near boiling, add your soda ash and stir. Once it dissolves, toss in your fabric and let it soak for 20 minutes. DO NOT skip this step. Soda ash is necessary to fully bond the dye to the fabric, because you are using ice. Without soda ash all of your dye will come out when you wash it.
Step 2: In the meantime, set up your racks. Honestly, this should 100% be done outside on your lawn. The ice is going to melt and the fabric and dye is going to drip. You don’t want this dye dripping on your floor. Technically you could set it up inside on a tarp? Doesn’t seem worth the risk to me.
Step 3: This is also a good time to pick out some of your dye combos. You can use as many as you would like! I usually use 4-5 different colors per piece. Through experimenting, red and orange will TAKE OVER your design…use those sparingly! Also, the yellow is really cool and bright. I tend to lean toward the Jacquard Procoin Antique Gold instead. Brown Rose is hands down my number one favorite color available.


Step 4: Once your fabric is done soaking, you’ll want to remove it and wring out a bunch of the extra liquid. Now it’s time to place your fabric on the drip racks. I have three favorite things to do here.
- Allow some edges to hang over. It allows the dye to run down and creates a beautiful effect!
- Scrunch and bunch the fabric. Maybe even give it a little twist here and there.
- Push the fabric down in between the rack holes with your pointer finger. This will cause the dye to run down that section and almost creates a flower effect.
If you aren’t using the same colors on your pieces, make sure you leave space between them on the rack as the dye will run across quite easily.


Step 5: Time to add the ice! Just pile it on your fabric. Make sure it makes it all of the way to the edge and no fabric is showing. You can’t have too much ice, but you can not have enough. If you’re working on a hot day this is where your time crunch begins!
Step 6: Add your dyes. Open up your first powder dye of choice. Dip in your small spoon and scoop up some powder. Shake it onto some of the ice cubes in a few different spots. Open your next color and sprinkle onto some clear cubes. Continue until your ice cubes all have a little bit of color on them. (Unless you want to try for white space in your design, but it’s kind of tough to achieve. Maybe not on your first try, lol.)


Step 6: And now you wait! 24 hours to be exact. Just allow the ice cubes to melt and disperse the dye throughout your fabric. If I’m leaving mine outside overnight, I usually cover it in a plastic tarp just to keep nature from ruining them (leaves, rain, squirrel poop, etc.)


Step 7: The next day, you are ready to rinse your fabric. I usually do an initial rinse with a hose to release any extra dye that may not have fully soaked in. After that, into the washer they go! Thanks to your soda ash soak, their color should be steadfast through washing with regular laundry detergent.
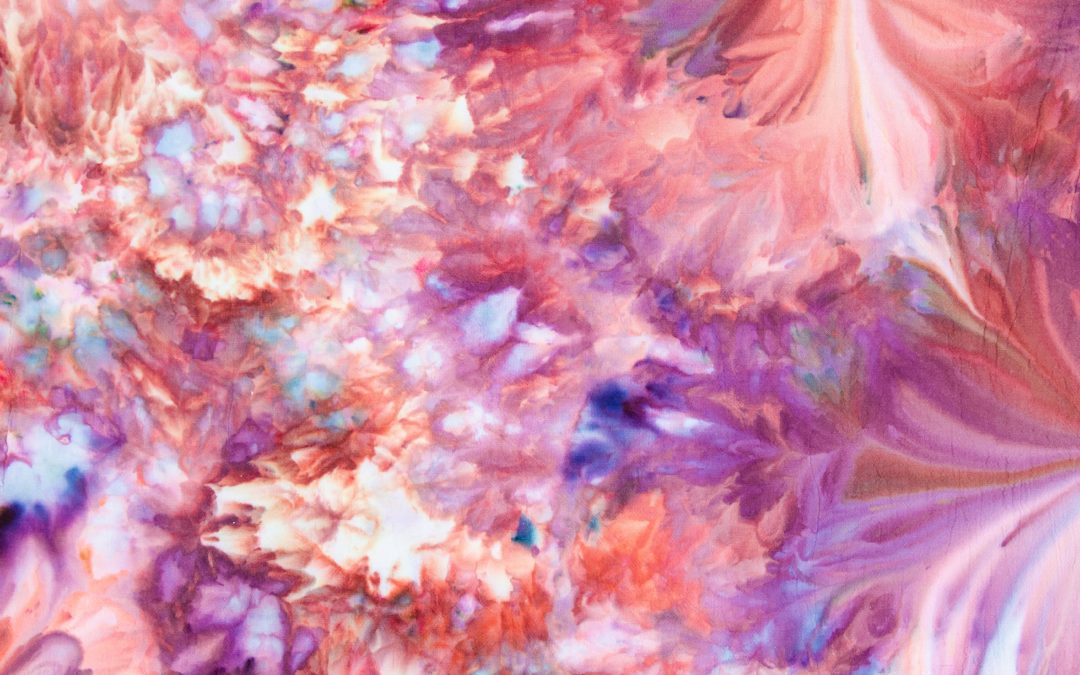
Step 8: Throw them in the dryer, remove and wa-la! Your beautiful works of art are complete and ready to use or gift! Here are a few of our favorites:


Gorgeous right!?! Now it’s you turn. You’ve got this. Now go have fun!
Cheers,
Liz

Hi Liz! Do you mind sharing what colors you used for the two at the very top of the page? The peachy pink/blue ones.
Thank you!
Hi Lauren, I am so sorry I’m just now seeing this. I hope your holidays were excellent! On my way home from a TV segment and will look closely and see if I can figure it out for you.
Ok! I’ve studied them and I think I have somethings close for you. The first one is heavy on peach, bubblegum and violet. I’m unsure if the deeper red color is brown rose or burgundy, and then it has a touch of pale aqua. The second one we went VERY light on the dye, giving it a decent amount of white space. It is lemon, brilliant orange, fuchsia and ice blue. I mean, a VERY light sprinkle. Brilliant orange can take over a whole piece very easily. I hope that helps! We would love to see what you create. xo, Liz
Hi Liz, following up on this question, I’m interested in the color combinations for the other photos, specifically #4, 5, 6, and 7 (primary colors: #4 green, #5 peach, #6 magenta, #7 yellow). Thank you so much for sharing your process.
Hey Cece! Yikes, it’s been so long since we did this, but I will try to guess for you. Please don’t hold me to it! Hopefully I have your numbers right.
#4 I call this one the Monet water lilies inspired one! Green I’m almost positive is emerald, you’ve got some lemon yellow in there, I’m pretty sure ice blue and peach. Maybe a hint of brown rose?
#5 Definitely peach and bright golden yellow with a hint of brown rose and ice blue.
#6 Carmine red, raspberry, bright golden yellow and i’m not sure what else but probably a little bright green
#7 Lemon yellow, navy, peach and antique gold (I think!)
Take ALL of these with a grain of salt and know that it matters how much dye you use. Lighter amounts of dye end up looking lighter than heavier amounts.
Good luck! Liz
Would you be able to list the colors you are using beginning from top to bottom? They all are amazing! I’m just learning and don’t have many things to experiment on…thank you
Hey Mo! Sorry for slow reply. The honest answer, is it was awhile ago and I don’t have my notes anymore. Oops! But I can make some educated guesses! I’m not positive about any of these. Starting with the images after all of the process photos:
#1 Lemon yellow and raspberry for sure. I THINK bright green and fire engine red.
#2 Lemon yellow, marine violet, peach and emerald green
#3 Burgundy, brown rose, navy and antique gold
#4 Green I’m almost positive is emerald, you’ve got some lemon yellow in there, I’m pretty sure ice blue and peach. Maybe a hint of brown rose?
#5 Definitely peach and bright golden yellow with a hint of brown rose and ice blue.
#6 Carmine red, raspberry, bright golden yellow and i’m not sure what else but probably a little bright green
#7 Lemon yellow, navy, peach and antique gold (I think!)
Good luck!!!
I had done ice dyeing a few years ago and it was amazing. I’ve just survived a very stressful two years and am now getting my life back and I realized I’d forgotten how to ice dye! The directions you have given are so clear and easy to understand. I feel so confident and excited now and am eager to get back to playing with dyes again. Thank you so much!
Seriously Kathlene, I hear you on surviving the last two years! So, congrats on making it to the other side of whatever was stressing you out, and welcome back to having some fun with arts and crafts. If you make anything cool and want to share pictures, we would love to see them!!! You can even share them privately via e-mail if you don’t want us to post them anywhere;) I really am glad to hear you are feeling better! Now go forth and ice dye! Cheers! Jen
My friends and I did some ice dying and I am not as happy with it as I would like to be. On your fabrics you can see a lot of veining with the color and ours looks nothing like that. Possibly we put on too much dye powder?
Hi Sue! It is hard to say why you had a different outcome without seeing a photo. The veining to which you refer is caused by the scrunching and twisting of the fabric. If you can give me a little more info or send me a picture, I may be able to help a lot more. That being said, this type of dying is just a lot of trial and error and getting a feel for which variables cause which outcomes. Everything from the amount of scrunching to the rate at which the ice melts is going to affect the final outcome and in full disclosure even Liz and I still get “duds” now and then and have no idea why. Like I said, if you can send me as much info as possible, I am sure we can get to the bottom of it. Look forward to hearing from you! Jen
Agreed with Jen! Send a pic and we can probably help diagnose the issue. 🙂 Liz