A little bit craft, a little bit science experiment, and a lot of “wait…this is gorgeous.”
There are certain DIY projects that make you feel wildly accomplished with surprisingly little artistic skill required. Botanical plaster casting — also called botanical bas-relief — is one of them.
Press plants into clay.
Pour plaster.
Wait.
Suddenly, you have something that looks like it belongs in a vintage botanical collection or a very smug design magazine.
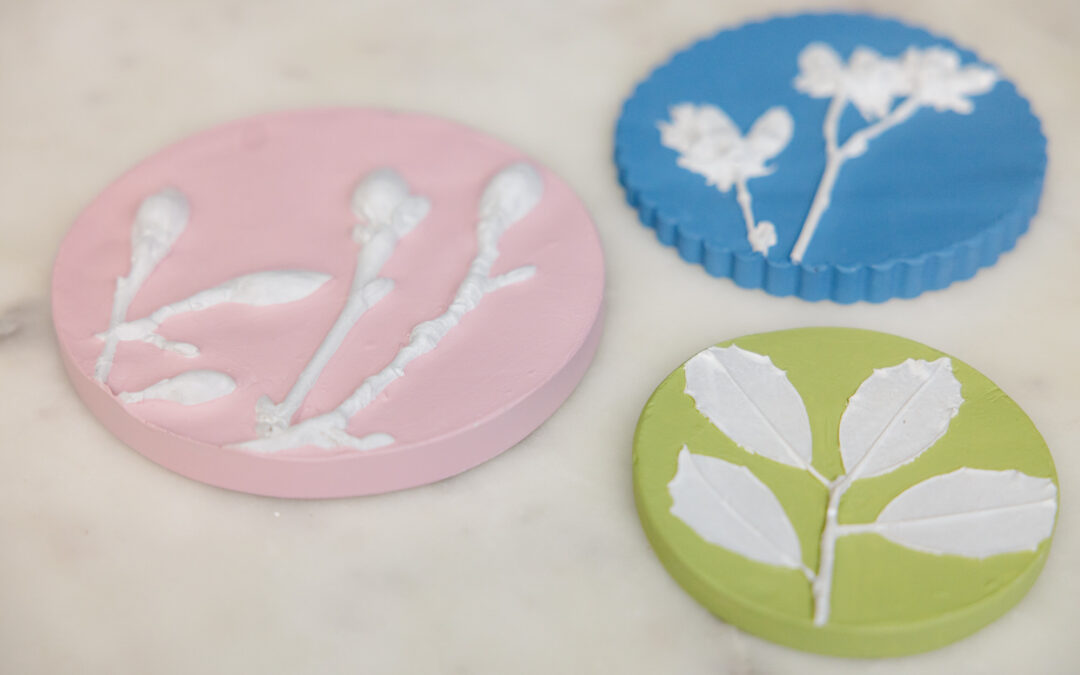
This technique has been used for centuries to create botanical bas-relief sculptures, where plants are pressed into a surface to capture every vein, stem, and petal in raised detail.
We tried it recently and immediately became obsessed. The plaster captures every tiny leaf vein and petal edge. Fair warning: once you make one, you’ll start looking at every plant in your yard like potential art.
Here’s exactly how to do it.


Quick Instructions for Botanical Plaster Casting
- Roll smooth pottery clay to about ¾ inch thick.
- Press leaves or flowers into the clay to create impressions.
- Remove plants and brush the surface with Murphy’s Oil Soap to seal the mold.
- Mix pottery plaster (100 parts plaster : 70 parts water).
- Slowly pour plaster into the mold and tap to release air bubbles.
- Let set for about one hour.
- Remove the cast and sand rough edges.
This simple process creates a botanical bas-relief sculpture, preserving the delicate details of leaves and flowers.
What You Need
Plaster
We recommend USG #1 Pottery Plaster.
- Bright white and captures intricate detail
- Harder than standard Plaster of Paris
- Begins setting in 10–15 minutes
- Ready to remove from the mold in about an hour
Typical ratio:
100 parts plaster : 70 parts water
Clay
Use a smooth pottery clay with very little grog (the sandy texture).
When you’re at the art store, just say: “I need smooth non-hardening pottery clay.”
Make sure it is not self-hardening clay.
Other Supplies
- Rolling pin
- Canvas for rolling clay
- Wood, metal, or plastic molds
- Murphy’s Oil Soap
- Small paintbrush
- Tweezers
- Mixing bucket
- Stir stick or whisk
- Sandpaper
Where to buy supplies
- Blick Art Materials
- Krueger Pottery Supply (Brentwood, STL)


THE LONG DRAWN-OUT INSTRUCTIONS:
Step 1: Roll Out the Clay
Roll the clay on a canvas surface until it’s about ¾ inch thick.
Press it evenly into your mold so the surface is smooth and flat.
Step 2: Press the Botanicals
Press leaves, herbs, or flowers firmly into the clay to create impressions.
Then gently remove them.
If little plant pieces get stuck, use tweezers to pull them out.
A few things we learned along the way:
✔ Thicker plants work better
✔ Thin petals don’t create much relief
✔ Herbs and sturdy leaves create beautiful texture


Step 3: Seal the Mold (DO NOT SKIP THIS)
Before pouring plaster, brush a thin layer of Murphy’s Oil Soap over the clay using a paintbrush.
This acts as a release agent so the plaster doesn’t permanently bond to the mold.
And when we say don’t skip this step, we mean it.
Because naturally the first time we tried this project… we forgot.
Everything looked great until the plaster set and we realized the mold and cast had fused together like some sort of DIY archaeological dig.
At that point there was only one solution:
Steve (Liz’s husband) had to literally cut the mold away so we could rescue the plaster cast.
The cast survived.
The mold did not.
So learn from our mistake:
Seal the mold. Every time.
Murphy’s Oil Soap = the difference between a satisfying reveal and calling Steve with tools.


Step 4: Mix the Plaster
Make sure your mold is completely ready before mixing, because plaster sets quickly.
To mix:
- Add water to your bucket
- Slowly sift plaster into the water
- Let it sit for 2 minutes
- Mix for 1–2 minutes until smooth
Try not to whip air into the mixture.
Bubbles are the enemy of detail.


Step 5: Pour the Plaster
Slowly pour the plaster into the mold.
Then gently tap or jiggle the table to help air bubbles rise to the surface.
Step 6: Let It Set
Plaster will begin setting in 10–15 minutes.
Leave the piece in the mold for about one hour, then carefully remove it.
Step 7: Finish the Piece
Use sandpaper to smooth any rough edges.
Brush away dust and allow the plaster to dry completely.
And just like that, you have a beautiful botanical bas-relief plaster sculpture.


Common Botanical Casting Mistakes
A few things that can ruin your cast (ask us how we know).
Skipping the mold seal
This causes the plaster to permanently bond to the clay.
Mixing too aggressively
Air bubbles destroy the fine botanical details.
Using clay with grog
The sandy texture prevents crisp impressions.
Waiting too long to clean tools
Plaster becomes incredibly difficult to remove once it dries.
One Last Important Tip
Rinse your mixing bucket immediately after pouring the plaster.
Plaster hardens quickly and becomes extremely difficult to clean once it dries.
Future you will be very grateful.


Want to Try This in Person?
We’ll be honest — this project is a little more involved than our usual art projects. It’s not difficult, but there are a few materials and steps that make it much easier to learn in person.
If this kind of botanical bas-relief project sounds fun to you, reach out! We’re collecting email addresses and considering hosting an in-person workshop here in the St. Louis area, where we’ll walk through the entire process together (with all the supplies ready to go).
Because let’s be honest — it’s always more fun to make a mess with friends.
If you’re interested, send us a note and we’ll add you to the list when workshop dates are announced.
Recent Comments